Saturday, October 31, 2009
Heating Complete? Check.
Today I finished all the details for the ceramic heater. I sealed both ends of the box, wired it up, mounted it in place and installed all the necessary foam to make sure that air can't leak around the sled and must go through the heating element. Not a very lengthy post, but it's nice to check off another task as done!
Friday, October 30, 2009
Heating Element
In this circumstance, I was fortunate that the second time was the charm. I really didn't want to have a third go at building this thing.
 Anyway, you can see the sled is done and the heater is installed in it. You may also notice that the new heater has a great deal less surface area than the original heater core. The new element is supposed to use 1500 Watts of power. To put that into perspective, that's the amount of power you're average hair dryer puts out, or 200 Watts more than your average Amish fake fireplace for that matter (yep, a hair dryer is more powerful). So I'm a bit concerned that it will actually warm the cabin adequately. Time will tell.
 Anyway, you can see the sled is done and the heater is installed in it. You may also notice that the new heater has a great deal less surface area than the original heater core. The new element is supposed to use 1500 Watts of power. To put that into perspective, that's the amount of power you're average hair dryer puts out, or 200 Watts more than your average Amish fake fireplace for that matter (yep, a hair dryer is more powerful). So I'm a bit concerned that it will actually warm the cabin adequately. Time will tell.
Thursday, October 29, 2009
I Guess I'll Try Again Tomorrow
So I spent three hours working on the sled for the heater this morning. When it was all done, it looked pretty good. The frame was nice and square, the heating element securely held in the center, no gaps for air to leak around or through. Very nice. The only problem was that it didn't fit. Apparently, I got one of the measurements wrong. I know which one, and I'm kicking myself, but that does very little good.
They say measure twice and cut once, but it doesn't really matter how accurate your measurement is if you've measured the wrong thing. Tomorrow, I get to spend more time with sheet metal, getting frustrated all over again and adding to the collection of nicks and cuts on my hands. Joy!
They say measure twice and cut once, but it doesn't really matter how accurate your measurement is if you've measured the wrong thing. Tomorrow, I get to spend more time with sheet metal, getting frustrated all over again and adding to the collection of nicks and cuts on my hands. Joy!
Wednesday, October 28, 2009
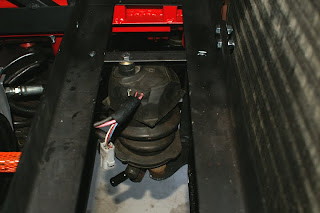
A/C Compressor is Mounted

Above, you can see the compressor mounted in the chassis. The arm on top is the arc that lets the compressor swing toward and away from the motor in order to tighten the belt. Below the compressor and just to the right, you can make out the gray plate that the bottom mounts are attached to. You can see that toward the upper right of the plate, the motor mount is bolted down on top of it. Also, you'll notice that now that I have the motor mount in place, I was able to finally mount the passenger side brace from the motor mount to the motor to help control any torque spin the motor might try under load.
On to the next project, the heater. With the engine gone, there's nothing to make hot water for the heat exchanger in the cabin. That equals no hot air, which could be bad if I need to defog the windshield. To replace the heat exchanger (which is really just a small radiator) I've got a small ceramic heater.

On the left is the original heat exchanger. On the right is the new ceramic heater. In the center is the box/sled I made out of sheet metal to hold the new heater. It has to be the same size as the original heater core so that it can be mounted in the same place. Below it are two rails that were attached to the heater core. They help the heater core slide in and out of the opening. Once I've got the sled drilled and screwed together, I'll need to cut out a space in the middle for the ceramic heater. The sled will do two things. First it will hold the heater, and second, it will fill the space that the original did, forcing air through the heater instead of letting it get around the element.

Here I've got the box pretty much assembled with the rails mounted to the side. Next, I need to cut some holes in it to accept the new element, and close the ends up. I'll put some foam weather stripping around it in strategic locations and put it in place.
Tuesday, October 27, 2009
A/C Compressor Work
Half way through today's work, I found myself asking the questions "Do I really need A/C?" I guess when it's 115 °F, I'll be very grateful I've got it.
So, you may have guessed that I spent the day working on the A/C system, and you'd be mostly right. I spent the day working on the mounting brackets for the A/C system. More steel cutting, drilling and fitting. But since I'm on the home stretch, the engine bay is much more crowded and it's getting difficult to work in the space. Still, it's coming along nicely.
I've got a bottom plate that will be secured to the sub-frame by simply sandwiching it between the sub-frame and the motor mount that bolts to it. It will also be held on the opposite corner by a small piece of channel iron that will be bolted to the chassis. It's surprisingly stable. Onto that plate, I'll bolt two pieces of angle iron which will hold the bottom of the compressor in place. The compressor will be free to pivot on those mounts just like on a normal car.
Above the compressor and mounted to one of the battery supports is a arced piece of steel. That arc matches the movement of the compressor as it pivots on the supports below. Essentially, it looks just like the mount you see for most alternators on normal cars. This way, I can mount the compressor to all these parts and move it toward and away from the motor, allowing me to tighten up the belt that will drive the compressor.
I have more work to do on it though. I'll be spending some time on it tomorrow, but I can't finish it up. Last week I visited a machine shop to have a bushing made. That bushing will allow me to mount the old power steering pulley to the electric motor, and I'll use that to power the A/C compressor. I need to get that back before I can finish this part of the project. Besides, I want to move on to some other projects.
Thursday, October 22, 2009
Electrical Work
Today I spent a good deal of time locating places for some of the electrical components and installing them in the area I call the electrics bay. First I mounted one of the fuse boxes. This one will be reserved for items that will be switched on only when the ignition is on. I have a second fuse box for items that will be powered all the time, but I haven't installed it yet.
Next, I found a location for the main contactor. That is a really big relay that turns the car on and off. It has an input for a 12 volt positive line and ground. When power is applied to that, it closes a contact that lets the full 160 plus volts through to the controller. That way, a small switch (the ignition) can control a very big load. Mounting it was a breeze, but I haven't run the high voltage lines to it yet.
There is plenty of space in the electrics bay, but it's mostly volume rather than surface area. I need surface area to mount the various components, so I built another small tray to hold them and it will sit below the controller's tray. Here's the tray and the components I'll mount to it.
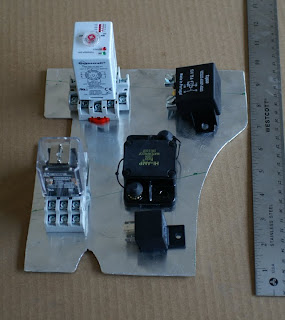
Traveling clock wise around the tray from upper left, we have...
1. The off delay timer. It will turn the electric power steering pump on when it receives a signal from the positional switch Len sent me. I'll set it so that once the pump comes on, it will stay on for a minimum of 1 minute. This way, I avoid "short cycling" the motor and burning it out.
2. The heavy duty relay that will deliver up to 85 amps to the power steering pump.
3. A self resetting breaker to protect the power steering pump from drawing too much current.
4. A 30 amp relay that will be wired to deliver power to the fuse box. When the ignition comes on, it will trigger the coil in that relay to turn on power to all the devices wired to it (i.e. the motor blower, the vacuum pump, the ceramic heater, the water pump to cool the Zilla, the pedestrian horn and a few other odds and ends).
5. And last, the relay to provide power to the ceramic heating element. With no engine to provide hot water to heat the inside of the car, I'll be using something similar to the guts of a modern space heater. They draw a lot of current, but fortunately, I live in Arizona so I won't be needing it very often :)
I also sealed the drain plug for the transmission and filled it up with fluid again. Lets hope this time we see no drips.
Last, I gave the car a new model name. When it was new, it was the 2.3 version of the Z3, which I thought was odd because the motor was a 2.5 liter motor, same as the 2.5 model. Anyway, on the back of the car, opposite the Z3 badge was a smaller 2.3 badge. It has been replaced.

Seemed appropriate.
Wednesday, October 21, 2009
Odds & Ends Part VII
No big projects today because I mangled my hand last night while trying to drain the transmission: more on why later. I had a craftsman ratchet wrench fail while I was putting all my might into it, and my hand was crushed/sliced open against that beautiful, accursed aluminum plate I made a few weeks back. I had thought the drain plug just gave way quickly, but that wasn't the case. The ratchet system on the wrench failed. You can imagine my surprise. So, what did I do today? Where to start...
1. Using a solid breaker bar I managed to break loose that drain plug with no further harm to my hands. Since I put the transmission back in and filled it with fluid, there's been a slow persistent leak coming from the bottom plug. Every few days, there would be a couple new drops of fluid on the floor. I kept looking at it, willing it to stop, but that didn't seem to work. The plug originally had some sort of blue sealant painted on it before it was inserted. I got some thread sealant to use, and soon, I'll be able to get the plug in and the tranny full of fluid again.
2. I ran all the coolant lines from the Zilla, the pump and the radiator. The Zilla controller will be handling up to 1000 amps and nearly 160 volts DC, so it will get hot without adequate cooling. A constant flow of coolant will keep it safe.
3. Using some JB Weld, I affixed some bolts to a side panel inside the electrical compartment. Those bolts will hold a big 12 volt distribution block. In the electrical compartment I found the original positive battery cable that supplied some of the car's power. I'll be tying that down to this distribution block for easy access to power. From that I can draw all the 12 volt power I'll need for the car's subsystems. Most of lines off of that will run to relays that are triggered only when the car is running. That cable originates in the back of the car where the original battery was, right near where the DC to DC converters are. Clever huh?
4. I also did a bit of repair work on the front bumper's lower spoiler. Someone had hit a parking structure at one point, and cracked the plastic. I was able to use a bit of the insanely strong plastic from the gas tank as a brace, and epoxied it in place from inside the bumper. The bumper has the original line now even if there is still visible damage. Perhaps some day, I'll replace it, but for now, I have more important things to work on.
Tuesday, October 20, 2009
Power Steering Pump
Well, after a two week hiatus (which I took unwillingly) I'm back working on the car. Today was the day to mount the power steering pump. I got the high pressure line back from the custom hose shop, and it looked perfect. They really did a good job. I figured the next thing to do was to see if all my measurements were correct, and if it actually fit.
Since the engine is gone, the means of driving a traditional power steering pump went with it. The most common solution amongst EV'ers that need power steering is to use an electric power steering pump. The most popular is the pump that Toyota put on the 2nd series MR2. If you're lucky, you can get one cheap at a salvage yard. If you're like me, there aren't any at any of the salvage yards in a 100 mile radius, which means they aren't cheap.
I put the pump in the fitting we'd made for it and began assembling the lattice work of steel I'd built to hold it, when I realized there was a better way. I've made an effort to avoid building things twice. In other words, build it once only to realize I'd missed something and then have to rebuild it. But in this case, it was clear I could do it much better. So, some quick measuring, steel cutting, shaping and drilling, and it was ready to go. I was actually able to eliminate twice as much steel as I added, so that's a nice bonus.
Once I got the pump mounted, I ran the new line to it, and it fit perfectly. Ok, it is a tad too long, but that's better than the alternative! Next, I had to figure out where to mount the power steering fluid reservoir.

I had an idea where I would put the reservoir, but hadn't sorted out how I would do it. A moments thought, and I figured it out. I quickly mounted it up and then ran the original feeder line from it down to the pump, only to find it was too short. A quick trip to the auto supply store, and I had one slightly longer hose.
All the mechanical aspects of the power steering system are done. I just need to fill it with fluid, and hope that there are no leaks. That's one more task finished, and that much closer to getting her on the road.
Since the engine is gone, the means of driving a traditional power steering pump went with it. The most common solution amongst EV'ers that need power steering is to use an electric power steering pump. The most popular is the pump that Toyota put on the 2nd series MR2. If you're lucky, you can get one cheap at a salvage yard. If you're like me, there aren't any at any of the salvage yards in a 100 mile radius, which means they aren't cheap.

I put the pump in the fitting we'd made for it and began assembling the lattice work of steel I'd built to hold it, when I realized there was a better way. I've made an effort to avoid building things twice. In other words, build it once only to realize I'd missed something and then have to rebuild it. But in this case, it was clear I could do it much better. So, some quick measuring, steel cutting, shaping and drilling, and it was ready to go. I was actually able to eliminate twice as much steel as I added, so that's a nice bonus.
Once I got the pump mounted, I ran the new line to it, and it fit perfectly. Ok, it is a tad too long, but that's better than the alternative! Next, I had to figure out where to mount the power steering fluid reservoir.

I had an idea where I would put the reservoir, but hadn't sorted out how I would do it. A moments thought, and I figured it out. I quickly mounted it up and then ran the original feeder line from it down to the pump, only to find it was too short. A quick trip to the auto supply store, and I had one slightly longer hose.
All the mechanical aspects of the power steering system are done. I just need to fill it with fluid, and hope that there are no leaks. That's one more task finished, and that much closer to getting her on the road.
Friday, October 9, 2009
Power Steering Line
Well, I did manage to get something done this week, in spite of that horrible flu that was trying to keep me down. I carefully measured out the new power steering line that I need fabricated. I took the measurements, photographs and drawings I made down to Alternative Hose in Phoenix and showed them what I need. They were all over it. They had the right fittings and had a plan straight away.
I expected it would take a week or so to get the hose done, but these folks are serious about getting their customers fitted with hoses and fitted quick. The guy I worked with apologized because they were busy that day, consequently it wouldn't be ready for 2 and 1/2 hours. That caught me way off guard; I would have planned my day differently to take advantage of that. But since I didn't anticipate such quick turnaround, I didn't plan for it, and my schedule happens to be tied up for a while. I can't pick it up until October 19th! I'll have to wait until then to examine what I'm sure will be some top notch work.
I expected it would take a week or so to get the hose done, but these folks are serious about getting their customers fitted with hoses and fitted quick. The guy I worked with apologized because they were busy that day, consequently it wouldn't be ready for 2 and 1/2 hours. That caught me way off guard; I would have planned my day differently to take advantage of that. But since I didn't anticipate such quick turnaround, I didn't plan for it, and my schedule happens to be tied up for a while. I can't pick it up until October 19th! I'll have to wait until then to examine what I'm sure will be some top notch work.
Tuesday, October 6, 2009
Bleh
No work today, and probably tomorrow. The flu has got me flat on my back.
Happy 16th birthday to my daughter Emily!
Happy 16th birthday to my daughter Emily!
Friday, October 2, 2009
Odds & Ends Part VI
Today was a day to take care of some smaller things.
I cut a hole in the trunk's battery box and mounted the ventilation tubing in it. I also ran the tubing to the fan mounted under the box that occupies the space where the gas tank was. I routed the tubing where I need it to go and secured it to the under side of the chassis so it doesn't move around and run into the suspension.
I also secured the wire loom that had been hanging in the trunk to the box mentioned above. Here's a shot of the trunk as it is now.
 Notice the nice clean appearance, and the tubing inlet in the lower left corner of the picture.
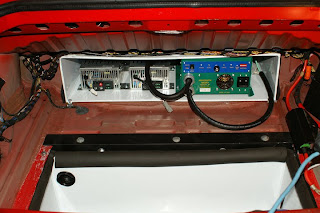
I marked and drilled several holes in the tray that will hold the Zilla controller. Once I sort out the position of all the other electrical components, I'll be able to just mount the Zilla to it and then drop the tray in place and bolt it down.
That's all for now, back next week.
I cut a hole in the trunk's battery box and mounted the ventilation tubing in it. I also ran the tubing to the fan mounted under the box that occupies the space where the gas tank was. I routed the tubing where I need it to go and secured it to the under side of the chassis so it doesn't move around and run into the suspension.
I also secured the wire loom that had been hanging in the trunk to the box mentioned above. Here's a shot of the trunk as it is now.
 Notice the nice clean appearance, and the tubing inlet in the lower left corner of the picture.
I marked and drilled several holes in the tray that will hold the Zilla controller. Once I sort out the position of all the other electrical components, I'll be able to just mount the Zilla to it and then drop the tray in place and bolt it down.
That's all for now, back next week.
Thursday, October 1, 2009
The Last of the Mechanical Stuff
It's a late post today; it's been a busy day. Let's see...
I built the support for the tray that will hold the Zilla and the Hairball, and mounted it in place. Looking at the space, it's clear that some of the electrical stuff will have to be placed under that tray. There simply isn't enough room on top. So I laid it all out on the garage floor, trying to pick the items that were likely to need any attention after install. Apart from a failure of any one component, I think I'm set. There is one thing I'm going to have to do, and that's to sort out what the remaining wires from the cars electrical system do. There aren't many, but I need to track them down. Bleh, not looking forward to that.
I took off the power steering line that ran from the old pump to the steering rack. I took several careful measurements and soon will be taking the old tube and the new pump down to a shop that can custom fabricate a new line. I'm dreading how much that's going to cost.
Spent some time cutting and fitting some duct work for the fan that will blow fresh air into the back battery box. It will be controlled by a thermal switch in the box.
With the completion of the power steering pump, and then mounting up the A/C compressor, there will be no more major mechanical things left to do. At that point, it will be just sorting out the electrical stuff. The truth is, what remains for the A/C and the power steering are pretty minimal, so I'll be setting those aside until I have all the parts. That means I'll be starting all the electrical work in earnest tomorrow.
Subscribe to:
Posts (Atom)