Well, we're back from vacation and I'm ready to start tackling the car where I left off. We welded up more bracing for the battery trays today. Today we worked on the tray that will hold three batteries in the back of the engine compartment, near the firewall. We got a lot done, but had to quit because it was getting late. We have some cross bracing to sort out, and then I just need to mount them up to the supports we've put in.
There are not too many mechanical things left to tackle. Need to mount the power steering pump, the A/C compressor, the vacuum pump, the radiator for the Zilla, and finally, the cooling fan for the motor. After all that, it's on to the electrical stuff.
Thursday, July 30, 2009
Monday, July 20, 2009
Thursday, July 16, 2009
Battery Support Part II
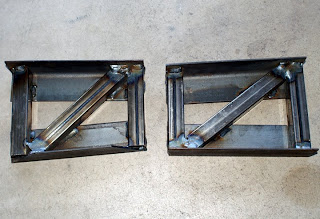
Tim (no relation) and I finished cutting and welding the steel for the frame I'll be using to hold the middle battery tray to the frame of the car. Admittedly it's not very pretty, but it's as strong as a really... big... strong... thing... Huh, can't think of a good simile. It's really sturdy, that's the point I'm trying to make.
Tuesday, July 14, 2009
Odds & Ends Part IV
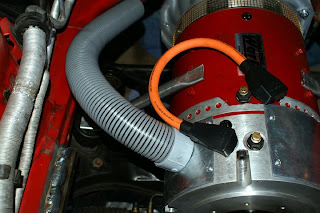
1. Finished the duct work for the forced air cooling on the motor. You can see the gray striped tubing heading toward the firewall. The fan itself will sit back in that area.
2. My first attempt at building a cable with 2/0 copper. It wasn't too bad really, but you can see that it takes a bit of a strange route. Why didn't I go in a straight line from one terminal to the other? Well, to do that, the lug under the rubber boot stuck up from the motor a full 1/4" more than routing it the way I did. Believe it or not, I need that 1/4" to help the batteries that will be sitting on top of that to clear the hood above.
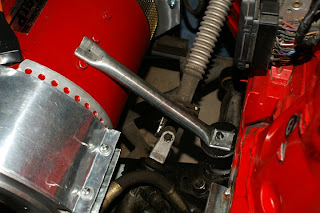
3. On both sides of the motor, you can see the brace I made running down from the motor to the motor mounts. Those are strictly to hold the motor in place when it tries to spin from the torque it generates when accelerating. I still need to drill the hole at the top to allow the 1/2" diameter bolt to go through it, but I don't have a drill bit that size yet.
Thursday, July 9, 2009
Battery Support Part I

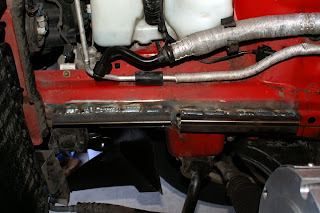
Spent the day with my friend Tim (no relation) working on getting some supports for the battery racks welded to the frame. They turned out very well. Once they are sanded down a bit and painted, they'll look even better. Most importantly, they are really solid. They'll easily hold the batteries and be able to take the abuse of any bumps along the road.
Yesterday I built the shroud that goes around the front of the motor. There had been a metal screen like you can see in the picture below on the back end of the motor. While the impeller in the motor would pull air in to cool it, I'll get much better cooling if I force air into it. So, in that shroud, on the upper part of the left side, I'll be fitting an attachment that will accept a 2" hose, which will be fitted to a squirrel cage fan. That should keep things nice and cool.

Tuesday, July 7, 2009
The Motor Support Is In Place

Above, you can see the piece of steel I spent several hours shaping. It's the black one just underneath the red motor, and resting on top of the black metal sub frame. I put a piece of high density foam between the bracket and the motor, mostly just to keep the motor from getting too scratched up. That little piece of steel lifts the motor up to the proper alignment and keeps it from resting on the steering rack.
On top of the little bracket I built, you can see I've bolted to it a strap that goes around the motor, holding it firmly down in place. I used some scrap steel (those little gray tabs) to hold the strap down on top of the bracket. I still need to trim the length of those bolts. Don't want them catching anything as I drive over it.
Thursday, July 2, 2009
Motor Support
I know I mentioned before that the motor is almost in perfect position where it is, but it's slightly low and resting on the steering rack. Well, that won't do. So today I spent most of the day fabricating a support that will rest on the sub frame just behind. That will raise the motor off the steering rack about 8 mm, and bring it, the transmission and the drive shaft in line. It has a coat of primer drying on it right now. I'll give it a good coat of paint tomorrow and install it Monday (I'll post a picture of it at that time too).
At one point I bought an old 120 VDC treadmill motor, and I planned to use that to run the compressor for the AC system. After getting the big traction motor in place, I've realized that's not going work. There simply isn't enough room.
The only option now is to run the compressor off of the traction motor. But of course, that means when I'm sitting at a light, the compressor won't spin unless I rev the motor a bit; after all, an electric car's motor doesn't move when you're sitting still. Not the best solution, but the only one open to me at this point. Later I might invest in one of those self contained complete systems they sell for golf carts. They're close to $2400, so I think I'll see how this goes first.
I'm going to need a pulley that will fit on the tail shaft of the motor and will accept the serpentine belt the compressor needs. As it turns out, the old power steering pump has one that will work. It was held to the pump by three bolts. I was thinking that I could have it machined a bit to fit the tail shaft and all would be well. Turns out it's plastic! Ok, machining it is out. That just means that I'll have to have a bushing made that will fit on the shaft and hold the pulley. Now to choose a machine shop.
Wednesday, July 1, 2009
Console Work
One of the things that's been on the list for a while is to prepare the center console for a new radio (the old one would forget to play CD's once in a while) and for the Link 10 battery monitor. The monitor does a number of things, but most importantly, it acts as a "fuel gauge" telling me how much charge is left on the main battery pack.
As luck would have it, the Link 10 is exactly the same size as the clock that came mounted in the center console in the car. I thought I'd be able to take the clock out by removing the radio, and reaching down into the cavity behind all the HVAC switches and controls, so I gave it a go. Well, there was more stuff in the way than I'd hoped so that plan was out. On to plan B, removing the console.
The manual gives pretty clear step by step directions for removing the console which looked quite straight forward and easy, and which just happen to be wrong. The manual covers every model and every year of the Z3 so some of the info is bound to be wrong for mine. As it turns out, it would be easier to dismantle a nuclear reactor with the broken branch of a tree and a bowl of pudding. As luck would have it, I was able to undo enough screws to get at the parts I needed without disassembling the whole thing.

As you can see from the picture, there are two gaping holes in the car, waiting eagerly for some new electronic bits.
As luck would have it, the Link 10 is exactly the same size as the clock that came mounted in the center console in the car. I thought I'd be able to take the clock out by removing the radio, and reaching down into the cavity behind all the HVAC switches and controls, so I gave it a go. Well, there was more stuff in the way than I'd hoped so that plan was out. On to plan B, removing the console.
The manual gives pretty clear step by step directions for removing the console which looked quite straight forward and easy, and which just happen to be wrong. The manual covers every model and every year of the Z3 so some of the info is bound to be wrong for mine. As it turns out, it would be easier to dismantle a nuclear reactor with the broken branch of a tree and a bowl of pudding. As luck would have it, I was able to undo enough screws to get at the parts I needed without disassembling the whole thing.

As you can see from the picture, there are two gaping holes in the car, waiting eagerly for some new electronic bits.
Subscribe to:
Posts (Atom)
